
Cultivating a star jasmine on a trellis may seem like a daunting task for novice gardeners. However, with the right guidelines, this activity can turn into a rewarding and enriching hobby. Star jasmines, known for their fragrant white flowers and climbing ability, can add a touch of elegance and charm to any outdoor space. This detailed guide will provide valuable tips for gardeners of all levels, from maintenance advice to pruning tricks, as well as techniques to guide the growth of star jasmine along a trellis.
An ideal location for star jasmine: where to place it
In order to adequately prepare the soil to promote the growth of the star jasmine trellis, it is essential to create a favorable environment for its development. The soil must be well-drained: feel free to add organic compost or even sand if necessary to prevent water from pooling and jeopardizing the sensitive roots of your plant.
Related reading : How to Prune a Tree Safely?
Additionally, you can incorporate a nutrient-rich fertilizer such as nitrogen, phosphorus, and potassium into the soil to support robust growth of the star jasmine trellis. However, be careful with the dosages mentioned on the packaging, as an overdose could harm the plant.
Once your soil is ready, dig a hole large enough to accommodate the roots of your star jasmine trellis without compressing them. Gently place the root ball in this hole and cover it carefully so that it is level with the rest of the garden.
You may also like : How to create a beautiful paved rose window?
After planting your star jasmine trellis, water this area generously to allow the roots to have sufficient moisture right from the start. To ensure their good health afterward, maintain a regular but moderate watering: this will prevent the soil from being too wet or even waterlogged.
To finish this optimal setup, also consider placing a substantial layer of organic mulch around your young plant, which will serve a dual purpose: retaining the necessary moisture for water needs and significantly limiting the proliferation of weeds that would compete unnecessarily with your precious plants.
Thus pampered right from its planting thanks to these simple yet effective tips during the soil preparation before planting, you give the star jasmine trellis every chance to thrive fully throughout its growing season.
The perfect trellis to support your star jasmine
Once you have chosen the ideal trellis, it is time to move on to the planting stage. To ensure optimal growth of the star jasmine, it is recommended to select a sunny location where the plant can benefit from at least six hours of direct sunlight each day.
Before planting your star jasmine, prepare the soil by adding organic compost to enrich its composition and improve drainage. Dig a hole spacious enough to accommodate the roots without crowding them. Ensure that the depth of the hole is slightly greater than the container in which your star jasmine was purchased.
Once the hole is prepared, gently remove the star jasmine from its container, taking care not to damage its fragile roots. Then place the plant in the hole and fill it with a mixture of equal parts potting soil and garden soil.
After completing the previous step, lightly pack the soil around the roots to ensure good stability for the young plant. Water your star jasmine generously while avoiding excess standing water that could harm its health.
To encourage harmonious vertical growth on your trellis, gently tie the main stems of the star jasmine to the wires or mesh of the support as it grows. Be sure not to tie them too tightly to allow the plant to develop freely.
Regarding maintenance, ensure that the soil remains moist but also avoid excess water, as this could lead to fungal diseases. A regular and moderate watering is therefore recommended.
A balanced fertilizer application twice a year in spring and autumn can also benefit the development of the star jasmine. Choose a fertilizer specifically formulated for climbing plants to provide the necessary nutrients for vigorous growth.
Keep an eye out for pests such as aphids or whiteflies on your star jasmine. In case of infestation, use natural methods such as insecticidal soap diluted in water or biological solutions to control these pests without harming the surrounding ecosystem.
By carefully following these tips and providing appropriate care to your star jasmine throughout its growth, you will be rewarded with a magnificent climbing plant whose delicate flowers will fill your garden with an enchanting fragrance. Enjoy watching its majestic ascent along the trellis, creating a true botanical spectacle full of elegance and charm.
Planting and maintaining star jasmine: expert tips
Once you have installed your star jasmine along your trellis, you need to take measures to protect it from diseases and pests that could compromise its health. The good news is that this plant is generally resistant to diseases, but a few extra precautions can be taken to maintain its vigor.
The first step is to regularly inspect your star jasmine for signs of potential infestation or infection. Yellowing, spotted, or wilting leaves can be indicators of potential problems. Chemical insecticides are often unnecessary to treat these issues as they can cause more harm than good. It is better to opt for biological and natural solutions.
If you observe the presence of aphids on your seedlings, this can be treated with a simple solution of soapy water applied directly to the infected areas. Adding a teaspoon of eco-friendly dish soap to a liter of warm water will do the trick. Spray this solution on the aphids, ensuring that all affected parts of the star jasmine are well covered.
Another common threat to star jasmine is the appearance of whiteflies, also known as whiteflies or silverflies. These small insects can feed on the leaves by sucking their sap, causing discoloration or even leaf drop. To control these pests, you can prepare a solution from 500 ml of water and add a few drops of neem oil or natural insecticidal soap. Spray this solution on the infested areas to eliminate the whiteflies.
You must emphasize the importance of good garden hygiene to prevent the spread of fungal diseases that can affect your star jasmine. Avoid excessive accumulation of dead leaves by regularly removing them around the plant. This will also allow your star jasmine to receive better light and air circulation.
Protecting your star jasmine from diseases and pests is not a difficult task if you are vigilant and proactive. By regularly caring for your plant, monitoring any unusual appearances on the leaves, and adopting natural methods to control these issues, you ensure a healthy and flourishing growth for your star jasmine throughout its climbing life along the trellis.
Do not hesitate to consult a professional if you encounter persistent problems or need additional assistance to maintain the optimal health of your precious star jasmine.
Protecting your star jasmine from diseases and pests
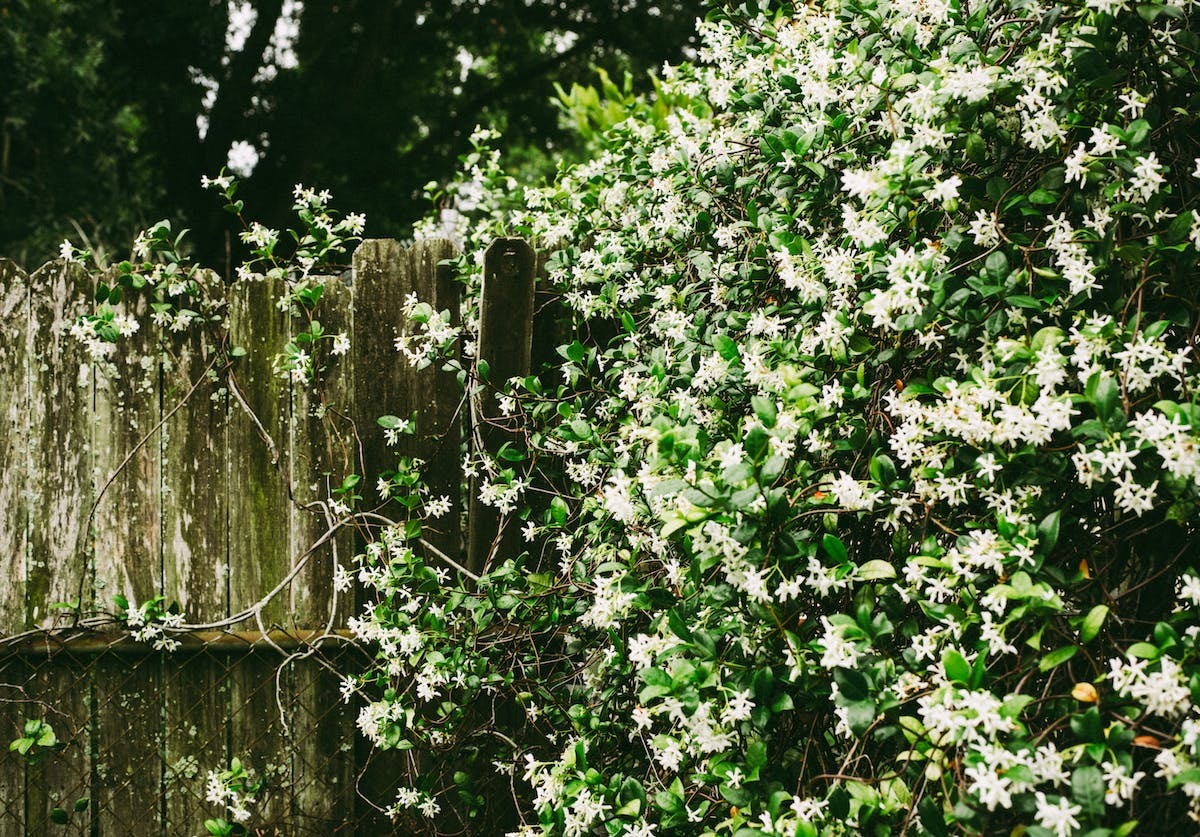
Once your star jasmine is securely established and maintained, you can fully enjoy its beautiful blooms. This plant is known for its delicate flowers with an intoxicating fragrance that will beautify your garden for several months.
The flowering period of star jasmine varies depending on the regions and climatic conditions, but it generally occurs between spring and summer. During this time, be sure to pay particular attention to watering the plant to maintain a good level of moisture in the soil. Slightly moist soil will promote better flower growth.
Adding an organic mulch around the base of the star jasmine can also help preserve soil moisture while protecting the roots from extreme temperatures. However, be careful not to apply the mulch too thickly to avoid suffocating the roots.
To encourage abundant blooming, you can apply a specialized fertilizer for flowering plants rich in phosphorus and potassium. This will stimulate the production of flower buds and strengthen the overall health of your star jasmine. Feel free to seek advice from a professional or a local nursery to choose the best fertilizer suited to your plant’s specific needs.
Regarding pruning the star jasmine, it should be done after its flowering period. You can remove dead, damaged, or weak stems to encourage the growth of new, stronger shoots. However, avoid excessive pruning that could compromise future blooming.
During the winter, be sure to protect your star jasmine from the harshness of the cold. In regions with harsh winters, you can cover the plant with a winter fleece or a thick cloth to provide extra protection against frost. Also, ensure that the soil does not dry out completely by lightly watering it when necessary.
By following these maintenance tips and regularly caring for your star jasmine, you will be rewarded with an abundance of fragrant flowers and an enchanting visual display throughout the seasons. Fully enjoy this magnificent climbing plant and let yourself be transported by its intoxicating fragrance in your peaceful garden.
Admiring the blooming and maintaining your star jasmine
When it comes to the propagation of star jasmine, several methods can be used to multiply this climbing plant. The most common method is through cuttings. For this, you will need to take a stem of star jasmine about 10 to 15 centimeters long, making sure to choose a healthy and non-flowering stem. Remove the lower leaves and dip the cut end in a rooting hormone before placing it in a well-drained mixture of potting soil and sand.
Keep the substrate slightly moist throughout the rooting process, which will generally take a few weeks. Once the roots have developed, you can transplant your young plant into an individual pot or directly into the ground if weather conditions permit.
Another option for propagating your star jasmine is through air layering. This technique involves making a shallow incision on a low stem of the star jasmine and applying a rooting hormone to this incision to stimulate the formation of adventitious roots. Wrap the incised part with a material such as damp moss or peat held in place by a transparent plastic film.
After a few weeks to a few months, depending on environmental conditions, the adventitious roots will begin to form around the incision. Once these roots are sufficiently developed, gently cut the new plant from the mother stem and transplant it into an individual pot or directly into the ground.